
 Christmas colors, a few days late I know! Happy holidays and Happy New Year to you all! Thank you all for making Dirt Girl Pottery very successful this year. Here's to a great new year!
 Christmas colors, a few days late I know! Happy holidays and Happy New Year to you all! Thank you all for making Dirt Girl Pottery very successful this year. Here's to a great new year!
 I had my 2nd annual Studio Sale today. Well, it wasn't exactly a studio sale, more like a "move all the furniture out the living room and put my show set-up sale." But, you get the point. I almost did have a sale this year because I've been so swamped with craft shows and gallery stuff, but I really wanted to do it. It's great for me to connect with friends and neighboors.
 Now my living room is back to normal and my pottery is back in the basement until next week! I'll be showing at the Old Crow Gallery for their holiday show.
Holiday Art Show
Opening Reception
Saturday December 13th 2008
5:30 pm - 9:00 pm
331 Cottage Road South Portland
Show runs Dec.13th thru Dec. 24th
Paintings Photography Glass Textiles Jewelry Pottery Sculpture
HolidaySale hosting over twenty local Maine artisans
207.347.8181 http://www.oldcrowgallery.com/
 I was talking to one of my dearest friends Shanna about throwing mugs last week. I love mugs. I love drinking out of them, love heating them up in the microwave and sipping my favorite beverage. But making them....hmmmm. Let's just say that the mug is not my most enjoyable form to throw. It's the handle. Let's face it, when I make bowls and tumblers, it's the few steps of weighing the clay, throwing the form and then trimming. With mugs you have to add the extra steps....
of pulling the handle, and then.....

drying them ever so slowly upside down for days and days so that the handle dries and the same speed as the rest of the mug.
Don't get me wrong, I love mugs, but this time of year, I'm mugged out! What about a nice tumbler or tea bowl???? Yeah, I know, you all want mugs. grumble grumble
Just kidding really! Okay, off to heat up my coffee in my favorite....mug!:)
 Here are some new encaustic pieces that I've finished in the last month. Above is titled "Orange Leaf". A few of these will be in River Roads Gallery, a wonderful little space in Skowhegan, Maine that has been showing my pottery and small clay sculptures since February.
"Tree Sky"

"Green Leaf"
 "Green Ovals"
I will be in the Holiday Show at the Old Crow Gallery in South Portland, Maine, from December 13-24 next month. If you're in the area, stop in and check out all the local artists. I'm the only potter so I'm really looking forward to some good sales.
 I've been making ceramic buttons since last winter and love them. They are really enjoyable for me to make since they are whimsical and just plain fun. They are awesome "kiln stuffers" which fill all the empty spaces in a firing so a potter saves money because there is no dead space. Carol Dean from SandFibers makes the most beautiful woven bead creations. She bought a few of my large buttons several months ago and listed one of them in a felted wrist cuff.

 I had an awesome time showing at Picnic Portland in Lincoln Park this past Saturday. I shared my tent with my long time artist friend Allison Villani, who makes recycled paper jewelry. The weather forcast was pretty sketchy, but then it cleared up and became beautiful. My 6 year old daughter was dropped off an hour into the show and stayed for 6 hours. I was completely floored that she was able to handle it that long, but she made a bunch of new friends and ran around the whole time throwing stuffed animals into air.
 Here's our shared space in my tent. We had so much fun hanging out. I remembered that Allison and I had met in this park 13 years ago while walking our dogs. We both lived in the Old Port at the time.

Kellie has so much fun making her amazing decoupage work. I have some of her bamboo tiles that she thoughtfully crafted just for me. She found many vintage pictures of potters and clay pots and decoupaged them onto the tiles. I later glued magnets on the back and get to see them everyday on my fridge! 
I been to a few etsy Maine Team meetings with Kellie and I love hearing her talk about her process. She enjoys finding the right phrases and passages and words in her vintage finds to create her pieces. I know that anyone who purchases one of her goods, will have something very special, not to mention funny as well! Kellie is a hoot, a great team member, and an awesome friend! Check out her shop!
 Here's all the equiptment: hot plate, stainless steel pot, stainless steel bowl, colander and ladle, silk screen, clothes pins and stirfry spoon.
 To make encaustic medium you need 5 parts beeswax to one part damar resin, which comes from a certain family of deciduous tree that grows in the East Indies. They have to be melted together slowly over low heat. The white stuff is the refined beeswax and the golden chunks are the damar resin.
 Okay now the damar is really melting now. Here is a gooey chunck stuck to the stirfry spoon.
 All done! Now it's time to pour it through the filter.
 Ooooh nasty! That junk was all in the damar crystals. It's bark and maybe some elephant hair.
 The wax is now poured into silicone muffin tins and tuna fish cans. I ordered the wrong size muffin tins. They said on-line that they were the standard size. Maybe for kids cupcakes....they were a lot smaller than I expected so I have to scrounge and find every tuna can laying around. Thank goodnes my daughter loves tuna sandwiches!
 Aren't they purdy? Aren't they just lovely? I'm so proud of myself. I gave myself soooo many hours to do this, thinking that I'd begin at 5:00 and slowly start the melting process. By the time 6:00 came I was already filtering 1/2 the batch and pouring the rest of the beeswax in. By the time 7:15 came, I was pouring the wax into the tins! I thought it would take much longer. Well, I must have done it right because nothing got set on fire in the process.
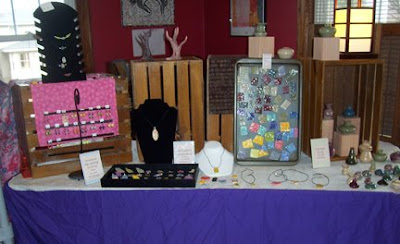
 I spend August 7,8,9 and 10th (four days!) at the UMC Cumberland Craft Show. It was looooong, but I felt I made a lot of great sales. As usual, my ringholders, spoon rests, and mini pots were my best sellers, but I also sold quite a lot of mugs and cereal bowls. And 12 pendants, which is very exciting since they are just simply fun for me to make and are a total bonus when they sell. I'll definately do this show again next year, but maybe do it outside in one of the animal stalls. I know that sounds gross, but the spaces are huge and cost a lot less than what I paid.
Close-up of my jewelry and button display.

 Here is one of the encaustic pieces I made at Kim Bernard's workshop during July 4th weekend. We made our own supports which are basically shallow boxes turned over. The sides of this piece are about 1 and 1/2" thick. The supports keep the piece from warping. If it warps the wax could crack...very bad. This piece has another mini box inset near the top where I poured wax into the cavity and stuck one of my mini vases in before the wax cooled. Underneath are a row of periwinkle shells. I'm having so much fun playing with the wax and trying some cool things out.
 These are my new buttons that I'm having fun with. I myself don't enjoy sewing but used to enjoy running my fingers through my mother's button box when I was little. I loved the feeling of the smooth buttons on my fingertips. These buttons and nice and large measuring anbout 1 and 1/2" wide. I've sold some in my Etsy shop and at craft shows. People seem to really like them. I had some shoppers ask if I could make them smaller, so I'm working on that now.
I'm also working on some sculptures for my fellowship work. I'm taking a weekend long workshop with Kim Bernard on the 5th and 6th at her studio in North Berwick, Maine. I needed to make some supports for the encaustic to adhere to. Anything pourous will work. I am so excited to try this on clay. I've been making these clay wall boxes for years and can't wait to see what I'll come up with. Here are two different sizes in the green stage. The "green" stage means that they are still wet and not leather hard yet. My basement is nice and cool right now with the humidity (as long as I keep the dehumidifier on all the time), so everything is drying nice and slow, perfect for slab work.


From the top left to right: semi-matte cream (in some parts of the glaze it comes out a beautiful blush color), raspberry (kind of touchy, need to work more with this one), semi-matte light green. On the bottom left: greenish-blue, then royal blue.

This is the raspberry glaze on a bud vase.


My tools: various clay tools for scraping and incising in the wax, natural hair bristle brushes to paint the wax with, and vegetable oil to spread the oil pigment sticks around the wax.

My painting station with the encaustic sticks. I melted them straight onto the hot surface of the griddle, set at 200 degrees. The clam can is holding melted medium, which is a combination of beeswax and damar resin. Smells so good! It's hard to believe that this wonderful smell (it's fabulous too) is harmful if inhaled too much.

Preparing a wood panel. I'm painting this with melted medium in one direction, then apply heat with the heat gun, then let cool, then paint another coat in opposite directions, apply heat, and so on for a total of three times. Then the panel is ready for encaustic paint.


This is my first experiment, well actually my second. My first one was so bad, I heated it up and scraped the entire piece off with a razor blade. You can see here that I tried incising and inlaid approaches. I also used pigment sticks for the little scratched green lines and the black lines. I'm totally addicted to those pigment sticks.

 Here is a close-up of the transfer I did. I gave it to Rob, sort of as a joke about his back issues.

This is a before shot of some ugly adhesive on the concrete wall. Before heat gun:


